 As a tutorial for photographers, my post about how to rename image files may be scary. To be honest, I do not launch a terminal on every import on my computer. Using softwares trough the command line may sound old fashioned, unfortunately, that’s the way you can get the best of them. As you saw in that post, once you defined the behavior of the tool, you will use the same command. Of course, it is ridiculous to launch a terminal and type it every time. There are some ways to incorporate them in your Workflow, and a really easy one for Mac-users. We simply have to use a little known tool, Automator. Automator is a tool that makes easy the creation of worflows for automating repetitive tasks. Exactly what file renaming is. Lets see here how to use it.
Creating and using tasks.
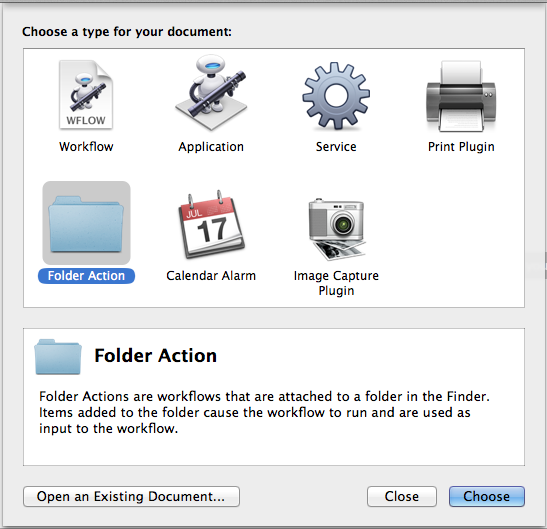
When you launch Automator, you launch a software in which you will create a task. You do not need to launch Automator to execute a task. A task may be a simple application you’ll launch or may be triggered under conditions. When you launch Automator and create a new task, you can choose its type. Before doing so, lets see what I would need.
I want to rename my files once they are copied on the computer. As they come from a camera, there is an obvious type, Image Capturing Plugin. But I may have some files coming from another source than my camera. Lets say that I made a copy on the Cloud or on a backup system while away and that now I import them. They will not pass trough the plugin.
Action types in Automator
That is why I have a folder which is an entry point to my computer. Every image comes in my Workflow are put in this folder. They should then have a basic process and be moved to their final destination. Automator provides another task type, the Folder Action. The task will be triggered on every file that enters the folder. This is exactly what we need. Choose this one.
Creating your Workflow
In Automator, you just chain up basic actions. All the available actions are on the left side. To add an action to you workflow, simply select it and drag it to the right. For our purpose, we’ll just need one action, Run a Shell Script. But right before that, we need to set up on which folder this task will run. To do so, choose your folder in the button on the drop down list on the top of your stack.

The chosen folder setup
But you have to know that while you are running the task from Automator, this setting will be ignored. If you want to test your Workflow (and you should), you have to add the Get Specific Finder Items action as the first action. Then add some test files to the action. Create a Test folder and copy some files in there. Add them to the action, they will just be send to the next action.
Now, add the Run Shell Script action. Check that the shell is /bin/bash and the Pass Input is As arguments. Then just add the following in the text field.
/usr/local/bin/exiv2 -r'%y%m%d-%H%M%S' -F rename $1;
This is nearly the same command as defined in the previous tutorial but with two differences. First, we have to call exiv2 by its absolute path, which mean its exact location on the filesystem. This should be the correct path, otherwise, in the terminal just type the following command
which exiv2
and copy and past the output.
The second difference is the last argument, $1. What does this mean ?
This Workflow will be triggered on every file that is created in the folder (created in the folder means created, copied or moved in the folder). That file will be passed as an argument. Remember ? I asked you to check the setting. $1 means the first argument (and there will not be more than one) which triggered the action, so, the file.

Your rename action.
If you set all this up, you can press the Run button. Everything should work perfectly.
Making this more reliable
Wait, what if you create a file that is not an image in this folder ? To avoid any unwanted behavior, you should filter the items. There is an action for that, it’s called Filter Finder Items. Drag it above the Run Shell Script action. Then, define the rule which is the kind of file is an image. Now add some non-image files in the Get Specific Finder Items action which is above the filter, and press Run. If you want to see what happened, press the Results button on the 2 first actions. That is the output of the action.
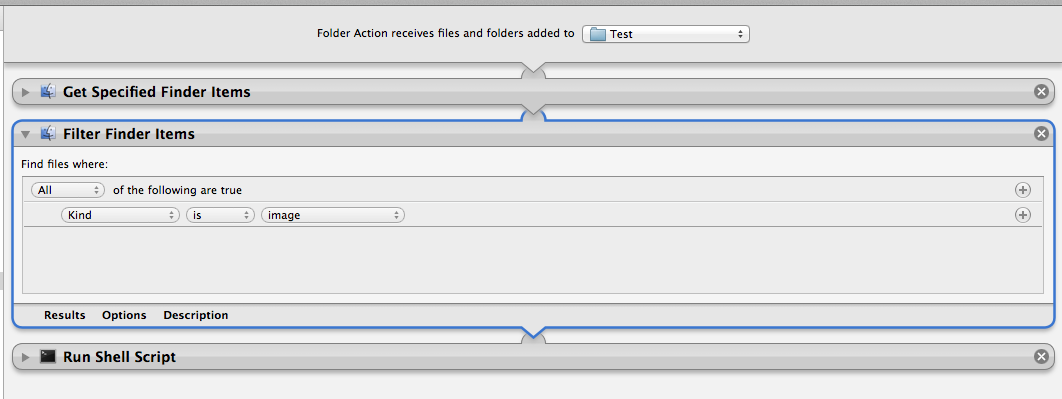
The filtering action
Using the folder action
Now that we have setup this workflow, we can activate it. Delete the Get Specific Finder Items action first. Then save it with an expressive name. That’s it, now when you’ll copy an image file in the folder you have defined in the workflow, it will be renamed.
Removing the Folder Action
You can easily remove a folder action. First, you can just delete the folder. The other solution is to right click a folder and select Folder Actions Setup. You’ll see first that you can choose an action for this folder. Of course, you can use a Workflow anywhere. Dismiss this dialog. Then, either disable the Folder action or just uncheck the action you don’t want anymore.
One step further ?
Not satisfied by this workflow ? What about automatically importing the images to Aperture once they are renamed ? Just add the Import Photos action as the last action. Oh, of course, this action is only available if you have Aperture on your computer. Using Import Files into iPhoto works the same way.
You can define in which project the images will be imported. If you want to be asked for every image, just press the option button and check the Show this action when the Workflow Runs. But remember that this action will be launched for every file, you may not want to do that.

Rename and import action
Are you using Lightroom ? Unfortunately, there are no Lightroom actions available for Automator that I am aware of. If you know a way, I will love to hear about it.
Take a look at what you have done.
Well look what we just set up ! With this simple workflow, you just have to copy your images to a folder and have it renamed and imported into Aperture. And we managed to use an awful command line tool… With Automator, you can see that anyone can automate repetitive tasks. Feel free to check out the other available actions, wou will certainly figure out another useful workflow.
About Darko Stankovski
I started to take photos with my father's Canon AE-1 as a kid and never rally stopped. I love to explore new techniques and will use this blog to post some tips. I can't really qualify myself as I enjoy landscapes, portraits, stages and toy photography. If you want to stay in touch, you can follow me trough those link.


Pingback: Exiv2 to batch rename my photos. | Darko Stankovski Photography